Failed Negotiations Definition of Mission: Location: - Mars or Venus
- An absolute bloody day
Background:Top-ranking officers of all conflicted corporations meet under superintendence of Brotherhood for negotiations. Cartel agents keep a jealous watch over every step and organize a Cybertronic air strike which causes a high amount of casualties and body counts. In the upcoming chaos the surviving units are trying to get an advantage over the other fractions. The guards of honor take hostages and retreat to more safe grounds. Everybody suspects the other fractions to be the culprit of the situation. The few brotherhood delegation get fast annihilated and all other units dig them self in defense formation. Basic support troops are waiting in the vicinity. A new try to discuss an exchange of prisoners will be impossible in this situation so every fraction is hell-bended on the violent try to free the hostages of their corporation.
Every fraction wants to take advantage over the weak position of the opponent. This is the chance to overrun the enemy and to collect sensitive information about their plans.
Because of the upcoming adverse weather the offensive has to start NOW! Situation: The guards of honor entrenched oneself with their hostages.
The basic support wants to free them.
The maximum numbers of rounds that will be played are 10 rounds.
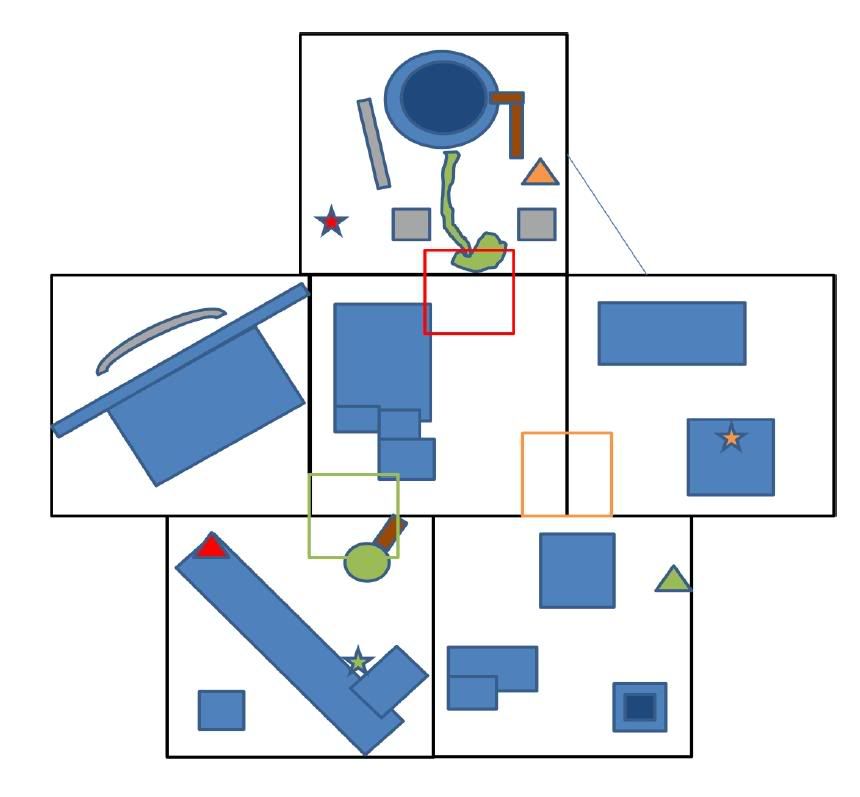
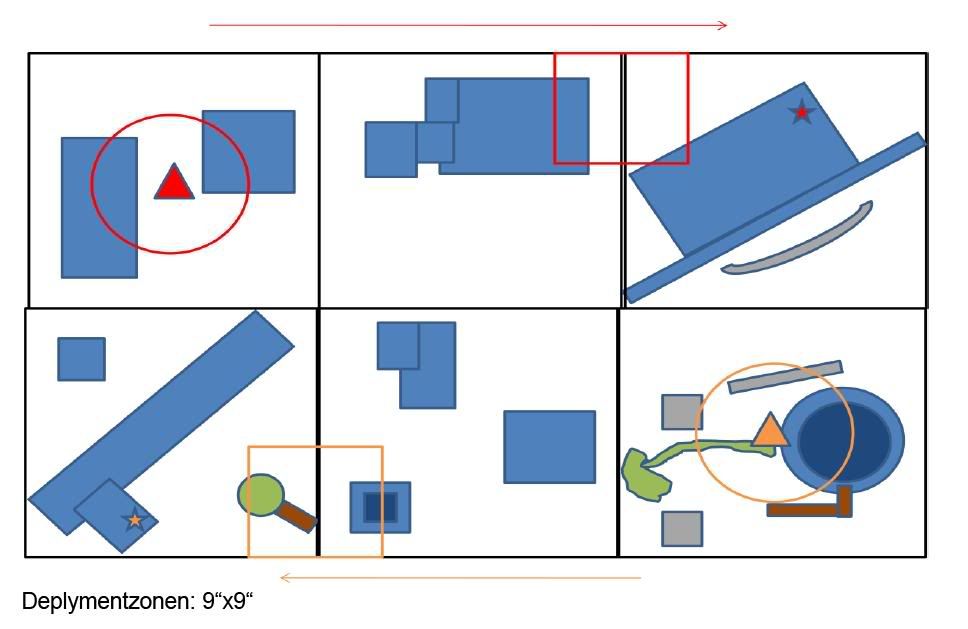
Setup of the field/Environment/Special rules: 2/4 player set up:
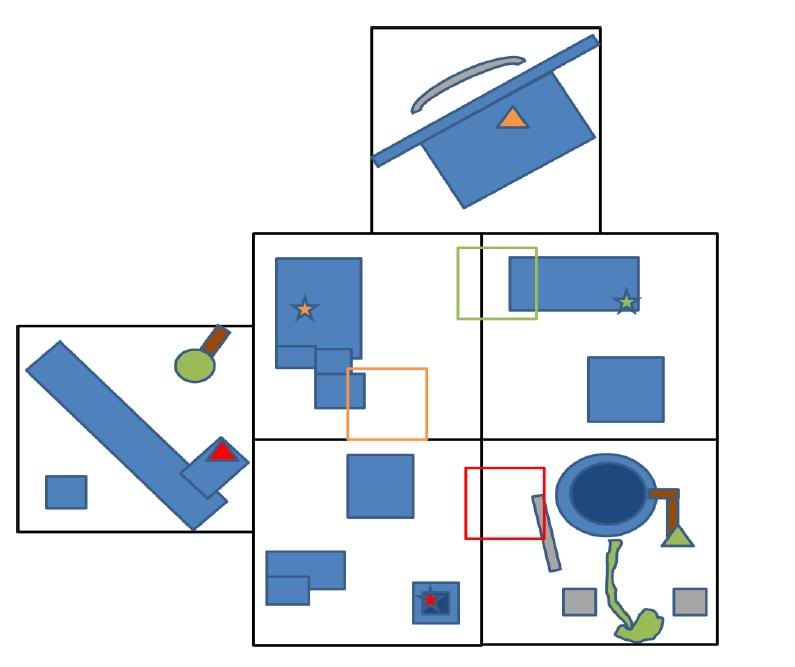
3 player set up:
 Distances:
 Midpoint (MP) of the square deployment zones to basis point: 14
Midpoint of the prisoner zone to the basis point: 30
Distance between the midpoints of deployment zones green/orange and orange/red: 18
Distance between the midpoints of deployment zones to the MP prisoner zone: 16
Deployment zone 5x5
Environment: The roll (to define the start level) will be done AFTER the deployment!
- Arctic/Jungle/Desert, will be defined by an roll of a dice: 1D20; 1-6 Arctic, 7-12 Jungle, 13-18 Desert, 19-20 reroll and the divisor for the level will be reduced by one
- Day/Night, will be defined by a roll of a D20; 1-15 Day, 16-20 Night (optional rule)
- The level will be calculated out of a the result of a D20/5 (round up)
- The upcoming storm will raise the environment level by 2 in the beginning of each round until it reaches a maximum level of 8 and then it will drop each round by 1 until the environment will be down to level 1.
Special rules:The lake around the bridge is frozen/silt up/dry up/ etc. It is possible to move over the terrain normally.
If somebody shots threw the pillars of the bridge the opponent will get soft cover. It is possible to pass the pillars with half MV for models of SZ 1 and 2.
Set up of the forces:
It is allowed to prepare (for each type of environment) one force. (The choice has to be done after the definition of the environment type)
Every player has 1000 points (700 in the case of 4 players)
The force has to include at least 2 individuals
No field engineering allowed
No OBA allowed
Deployment: The two most top-ranking officers (Individuals) have to be handed over to one opponent as hostages. (The ranking: real FC>FC>DC>UC, in the case of equal ranking the more expensive one will be used). The hostages are not able to do anything except of moving with their guards (it is not allowed to shot, to defense themselves, etc, and it is prohibited to take their LD for the initiative!, in general it is not allowed to create any benefit for the player).
The guards of honor (max. 450 pts [300]) with their hostages have to start in the open field around the starting point (triangle = prisoner zone) is a 12 security zone. It is not allowed to deploy inside this zone any infiltrating units. The assigned deployment area is an equilateral triangle with an edge length of 5. The prisoner point is in the midpoint of this triangle.
The retract point/basis point is marked with a star. Around this point is too a 12 safety zone where no infiltrates are allowed.
The guards of the hostages have to be a squad which is no support unit.
The hostages have to move and act as part of the guard squad (Command distances has to be respected for the hostages, too).
The rest of the force will be deployed regarding the standard rules into the square deployment zone.
Clarifications and liberation rules:The direction of movement is roughly from the triangle to the star. Each player/team has its own color.
In the 3 player scenario gets the green player the hostages of the red, the red gets the one from orange, and the orange gets the one from green.
In the 4 player scenario they have to build two teams. Each team will get 4 prisoners.
The liberation is only possible with a squad, which could be commanded by the prisoner they free!:
Liberation rules:1. A squad which is in LD-distance to the prisoner will be activated:
- The hostage will become directly part of the squad and will be activated with the squad. Until he is in CD of the guarding squad he can only move, nothing else. At the point where he left the CD he can act normally. He can for example fight the enemy. At the point where he enters the CD of the liberating squad he counts as full liberated.
2. The guarding squad gets activated and the squad is in LD distance of an opponent squad:
- The hostage can try to escape, he will be activated as the first model of the guarding squad; if he can enter the CD of his own squad he will counts as liberated. If he left the CD of his guards or if he got liberated it is allowed to attack him.
- Further is it allowed for model that can attack their own units, to attack and to kill the hostages. The hostages cannot defense themselves.
To carry strategic positions:Such a position is accepted as captured if a model in B2B-contact will use three actions. These actions have not to be consecutive. It is possible that different models of the same player will spend these actions. The size of these points is 3. This means up to 5 model of size 2 can get into B2B-contact. Model which are in CC are not able to spend actions.
After these actions the point will be counting as owned by the opponent. The original player can recapture the point regarding the same rules.
Victory points (VP):Victory points will be determined in real time.
At the moment where a player fulfills a victory point condition he will get the points.
Every player starts with 150 VP.
The VP are cumulative.
Each lost of a wound: -1 VP
Each wound scored at an enemy: 1 VP
Lost of a whole squad: -5 VP
Kill an individual or vehicle: 5 VP
Liberation of a hostage: 50 VP
Arrival of an own liberated model at the own prisoner point: 50 VP
Arrival of an own liberated model at the own basis point: 50 VP
Arrival of an own hostage at the own basis point: 50 VP
Kill of a liberated model: 30 VP
To carry his own basis point: 30 VP
To carry the enemies prisoner point: 25 VP
To carry the enemies basis point: 50 VP
Kill of a hostage: -30 VP
For each own squad which is panic or panic individual/vehicles at the end of a round/end of game: -2 VP
For each own squad which is broken or broken individual/vehicles at the end of a round/end of game: -3 VP
Winner of the scenario:The game ends after 10 rounds.
The player/team with the highest VP score wins the game except the opponents capitulate.
Special victory condition:
All own hostages get liberated and can reach the own basis point.
Optional 3 player set up: